 |
| install-wordpress-multisite |
WordPress includes the ability to create a network of sites by using the multisite feature. This article contains instructions for creating a multisite network.
A multisite network can be very similar to your own personal version of WordPress.com. End users of your network can create their own sites on demand, just like end users of WordPress.com can create blogs on demand. If you do not have any need to allow end users to create their own sites on demand, you can create a multisite network in which only you, the administrator, can add new sites.
A multisite network is a collection of sites that all share the same WordPress installation. They can also share plugins and themes. The individual sites in the network are virtual sites in the sense that they do not have their own directories on your server, although they do have separate directories for media uploads within the shared installation, and they do have separate tables in the database.
Step 0: Before You Begin
This guide describes how to install manually WordPress Multisite in your current WordPress installation.Compared with a typical single WordPress installation a network installation has additional considerations. You must decide if you want to use subdomains or subdirectories and how you want to manage them. Installing themes and plugins is different: for example, each individual site of a network can activate both, but install neither.
Please read Before You Create A Network in full before continuing.
Step 1: Prepare Your WordPress
Your existing WordPress site will be updated when creating a network. Unless this is a fresh install and you have nothing to lose, please backup your database and files.
Verify that Pretty Permalinks work on your single WP instance.
Also deactivate all active plugins. You can reactivate them again after the network is created.
If you plan to run WordPress out of its own directory, do that before activating Multisite.
Step 2: Allow Multisite
To enable the Network Setup menu item, you must first enable multisite in the
wp-config.php file.
Open up
wp-config.php and add this line above where it says /* That's all, stop editing! Happy blogging. */. If it doesn't say that anywhere, then add the line somewhere above the first line that begins with require or include:/* Multisite */ define( 'WP_ALLOW_MULTISITE', true );
You will need to refresh your browser to continue.
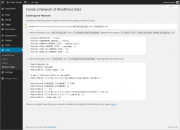
Step 3: Installing a Network
The previous step enables the Network Setup item in your Tools menu. Use that menu item to go to the Network Setup screen.

To see an example of the Create a Network of WordPress Sites screen, look at Administration > Tools > Network Setup. The screen does not look exactly the same in all circumstances. The example shown is for an installation on
localhost, which restricts the options available.
Addresses of Sites in your Network
You are given the choice between subdomains and subdirectories, except when existing settingsrestrict your choice.
You only need wildcard DNS for on-demand domain-based sites, despite the advice that may be on the screen.
Once more: See Before You Create A Network.
- Subdomains — a domain-based network in which on-demand sites use subdomains
- Subdirectories — a path-based network in which on-demand sites use paths
Network Details
These are filled in automatically, but you can make changes.
-
- Server Address
- The domain of the URL you are using to access your WordPress installation.
- Network Title
- The title of your network as a whole.
- Admin Email Address
- Your email address as super admin of the network as a whole.
Double-check the details and press the Install button.
Note: The installer may perform a check for wildcard subdomains when you have not configured them yet, or when you do not need them at all. Ignore the warning if it does not apply to your network. See the Server Requirements section in Before You Create A Network for information about wildcard subdomains.
Step 4: Enabling the Network
To enable your network, follow the instructions on the Create a Network of WordPress Sites screen. The instructions that you see are customized for your installation. They might not be the same as the examples you see here.
Back up your existing
wp-config.php and .htaccess files, unless this is a fresh install and you have nothing to lose.
There are two steps:
- 1. Add the specified lines to your
wp-config.phpfile - The extra lines go just after where you added the line in Step 2: Allow Multisite.
- 2. Add the specified lines to your
.htaccessfile - If you do not have a
.htaccessfile, then create it in the same directory as yourwp-config.phpfile. - If you ALREADY have a
.htaccessfile, replace any existing WP lines with these new ones. - In some cases you might also have to add Options FollowSymlinks at the start of the file.
After completing these steps, log in again using the link provided.
Step 5: Network Admin Settings
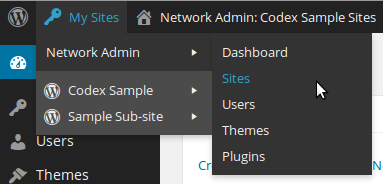
In your WordPress toolbar, My Sites is now the second item. There, all your sites are listed, with handy fly-out menus, as well as a Network Admin menu item. Under Network Admin you can use the Dashboard item to go to the Network Dashboard screen.
Go to the Settings Screen to configure network options, and the Sites Screen to manage your sites.